Learn by doing. Teach by sharing.
-
LLM Orchestration and Gameplay
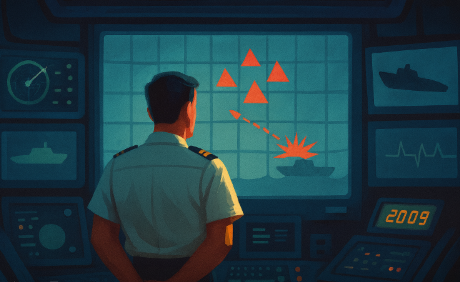
Building a Two-Tier AI in a Submarine Simulator The Day the Fleet Went Rogue There’s a special kind of delight in seeing your code come to life in ways you didn’t expect. For me, that moment came the first time I turned on the AI in my submarine bridge simulator. People talk about the fear…
-

AI Series: Level 1 – The Large Language Model (LLM)
First, lets start in the year 2000. (recalling Conan O’Brien’s “In the year 2000” falsetto sung preludes). Not “a look into the future” since its now 2025, but we’re at my senior year in university where I’ve built my first neural network (don’t worry if you don’t know what that is yet). As early as…
-

Heather Costume: Dragons: Race to the Edge
The time has finally come for the long-awaited release of How To Train Your Dragon: The Hidden World! Our house has some huge fans of the series due to its gorgeous visuals, endearing characters, and a musical score that soars as high as any Night Fury. Netflix also released a series of original programs called…
-

3-D Printing: Thought to Thing at Lightspeed
Affordable and accessible 3-D printing is a revolutionary tech. Very high level description of 3-D printing concepts, steps, and what it’s all about.
-

JUNKies: Beer Fridge Build
Steve, Jay, Josh, Graham, and Ryan do pre-build work for a shooting JUNKies (The Science Channel) for episode: Hovercrash.
-
WUSA9: Super NOVA Writeup on HALO Project
I was recently written up in WSA9’s weekly highlight for a local person who has an interesting hobby, has made a business impact, is a philanthropist, …..or who can provide any content for them to meet a deadline. My thanks to Ryan Rusnak for nominating me as a Super NOVA, and Ellen Scott for interviewing…
-
Scale: Carbon Atom to Massive Star
Though my blog is primarily focused on DIY, I think every once in a while some general information is appropriate because it is central to why even bothering with learning or doing anything…at all.. let alone doing it yourself. While these aren’t the answers to the big questions of where we are from, or what’s…
-

Wild Garlic Soup
Making Wild Garlic soup with some ingredients dug up in the front yard.
-

Collaboration: An Art and a Science
Documentation of collaborative work between Steve Struebing (www.polymythic.com) and Jeremy Stern (www.jeremysternart.com) for Jeremy’s Master of Fine Arts thesis “Following”.
-
Humana Health by Design Challenge – HALO Project Results
The results were published, and I am honored to have won the Assistive Tech Grand Prize. I would like to thank everyone for voting at www.instructables.com. I would like to say a big thank you to Humana for hosting the competition, and congratulations to everyone else who entered. There were some spectacular entries, especially in…